Wheelie Bin Maintenance Checklist for Councils and Contractors
Good bin maintenance means checking eight things on a regular cycle: wheels, axles, castors, brakes, lids, hinges, locks and the bin base. Most faults start small, such as a worn axle end or a stiff brake, so a quick check at each service stops a breakdown at the kerb.
Key takeaways
- Bin maintenance works best on a fixed cycle, not only when residents report a fault.
- Most wheel failures start at the axle, so check axle ends and clips at every service.
- On four-wheel bins, test every brake and spin every castor.
- Replace lids, hinge pins and locks early, since a broken lid lets waste spill and blow away.
- Record each repair by bin model, so you can see patterns and order the right spares.
Why Bin Maintenance Pays
A council or contractor may run tens of thousands of bins. Each one rolls to the kerb, rides a lift and gets tipped many times a year.
So small faults add up fast. A wobbly wheel becomes a missing wheel, a cracked lid becomes a full replacement, and each failure brings a call-out and a complaint.
Planned bin maintenance turns that pattern around. Instead of reacting to faults, teams find them early and fix them in minutes with the right spare part.
It also protects crews. HSE notes that musculoskeletal disorders make up roughly a third of injuries in the waste industry, and its waste guidance links most of them to collection work. A bin that rolls freely is easier to move safely.
Set Up a Bin Maintenance Cycle
First, decide how often each type of bin gets a check. Household bins usually need less attention than commercial containers that move every day.
Next, choose where checks happen. Crews can spot obvious faults on the round, while a depot suits full services with tools and spares.
Then build a simple form. Use the eight checks below, plus space for the bin model, the date and the parts used.
Finally, review the records every few months. Patterns soon appear, such as one bin model that loses wheels or one street where lids crack in the wind.
1. Bin Maintenance Starts With the Wheels
First, start at the bottom. Spin each wheel by hand and look at the tread.
A healthy wheel turns freely and runs true. However, a wheel that wobbles, drags or shows deep cuts needs replacing.
Also look for fine cracks in the rubber. According to the natural rubber article, rubber can crack when exposed to ozone, so older treads often show cracks on the sidewall first.
When one wheel fails, check its partner closely. Both have usually covered the same distance, so replacing them as a pair saves a second visit.
2. Axles and Clips
Most wheel problems begin at the axle. So bin maintenance should always include a close look at both axle ends.
Check that the clips or caps sit fully home and that the grooves still hold them firmly. Then look for rust and flat spots on the ends.
Rust deserves attention. As the galvanization article explains, zinc protects steel as long as the coating lasts, but once it wears through, rust spreads quickly.
If an axle has a bend or worn ends, replace it with the wheels. Our wheel replacement guide walks through the steps.
3. Castors on Four-Wheel Bins
Large containers, by contrast, run on castors instead of an axle. Push each one by hand and watch how it swivels and rolls.
A stiff swivel, a grinding bearing or a flat-spotted tread all make a loaded container harder to move. In addition, check the top-plate bolts, because loose fasteners let the castor rock.
Large containers carry heavy loads. For example, Wealden District Council lists a maximum load of 440 kg for an 1100 litre bin, so worn castors show up quickly.
4. Brakes and Directional Locks
Next, test every brake as part of bin maintenance. Engage the pedal and push the bin firmly from several sides.
A total-lock brake should stop both the wheel and the swivel. If the bin still creeps, clean the pedal area first, then replace the castor if the brake still slips.
Where bins use directional locks, check that each one holds the swivel straight. Our castor brake guide explains each brake type in detail.
5. Lids and Hinge Pins
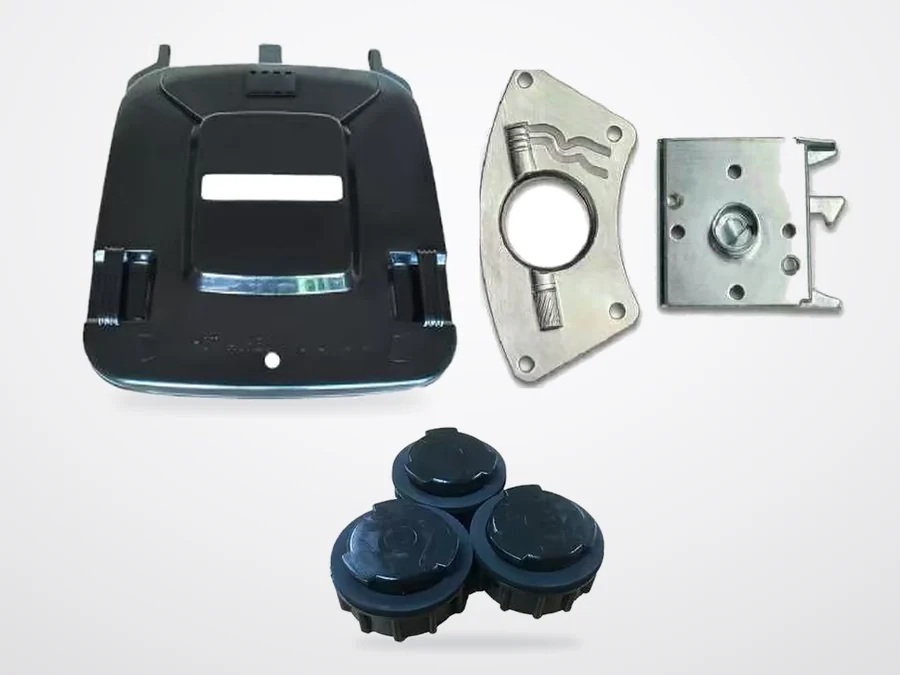
A lid also does more than keep rain out. It keeps waste in, stops animals getting in and keeps the bin tidy at the kerb.
So open and close each lid during bin maintenance. Look for cracks, warping and missing hinge pins.
Fortunately, replacement hinge pins are a fast fix. Even so, match them to the bin model, since pin sizes differ between makers.
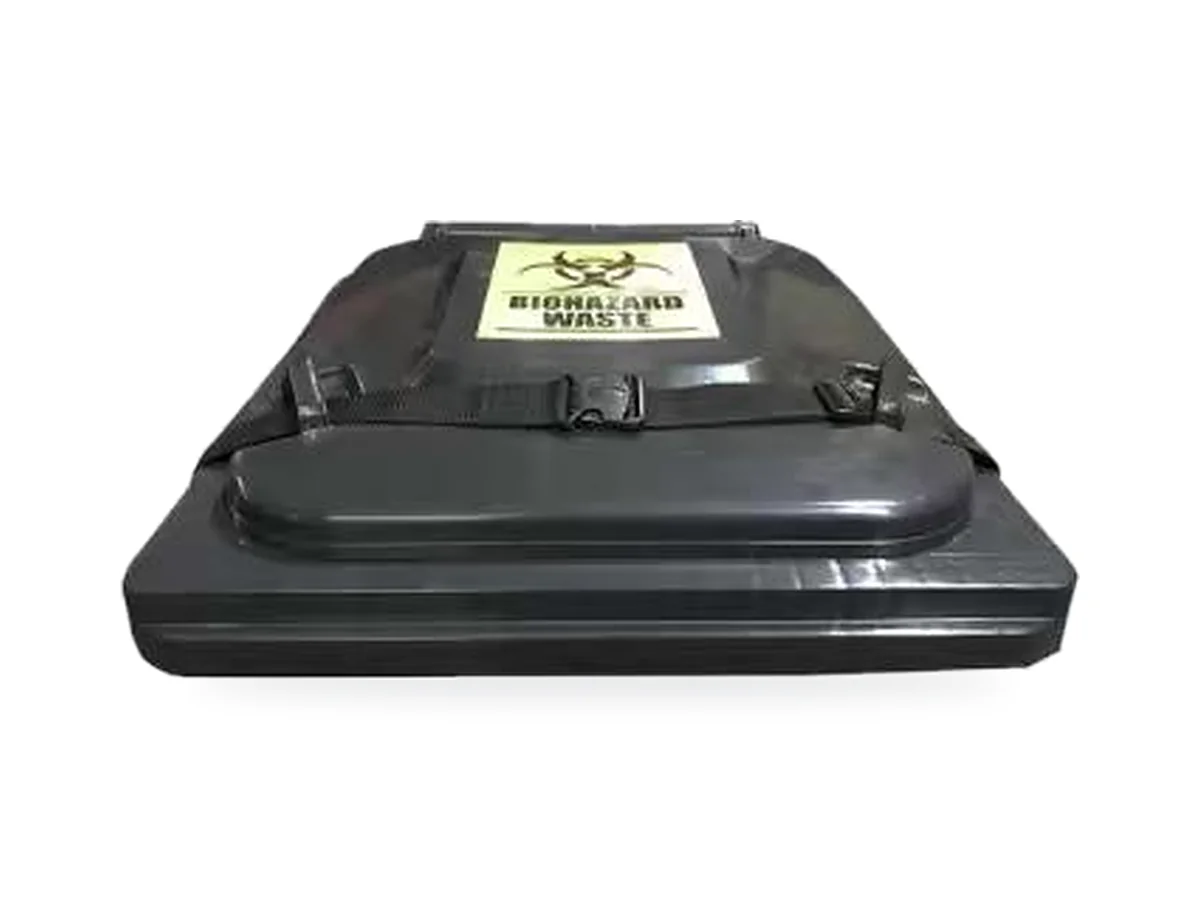
For windy areas and clinical waste, consider a lid secured belt. It holds the lid shut on 120, 240 and 360 litre bins.
6. Locks and Security
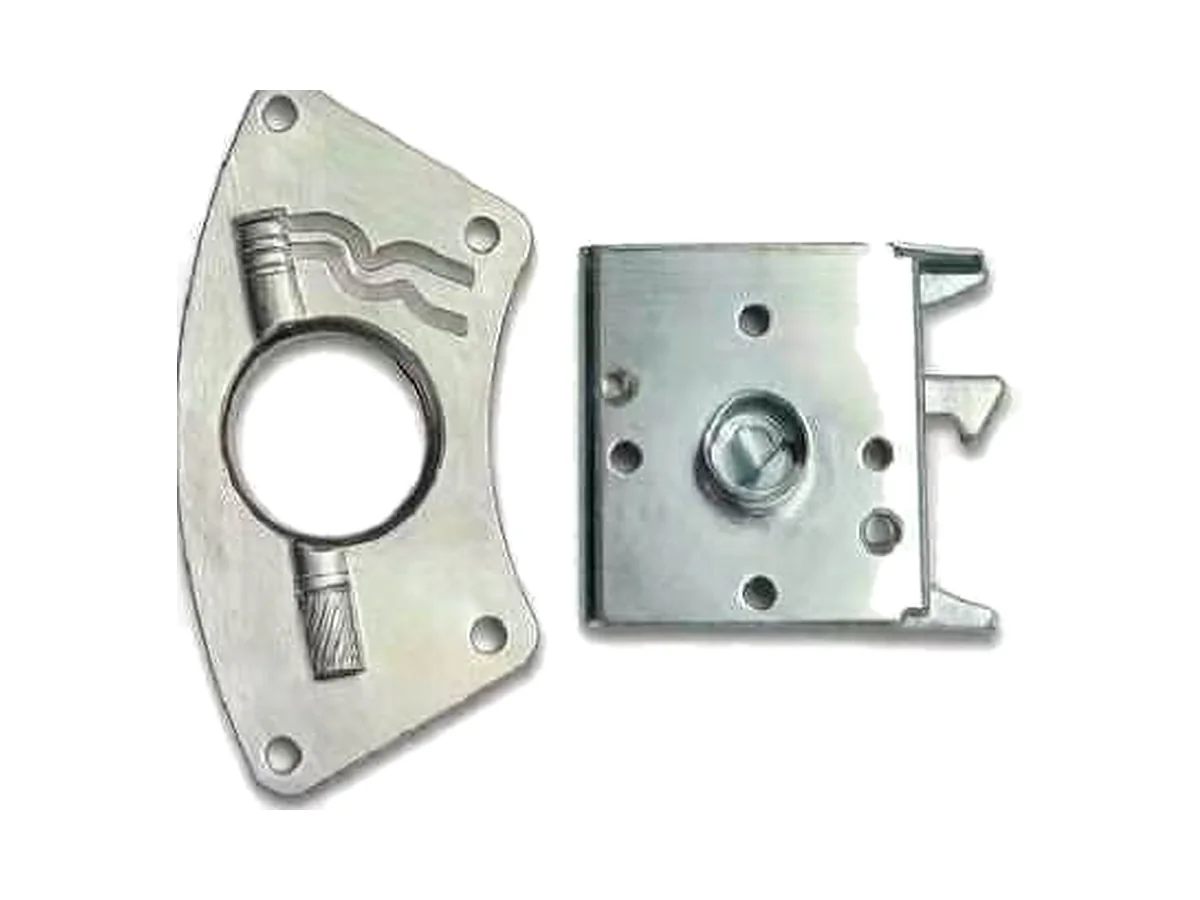
In addition, locks protect both the waste and the public. Our metal lid lock for two-wheel bins keeps the lid closed against scavenging and animals, and stops waste leaking when bins stand at the kerb.
Waste on the street is a wider problem too. The government publishes annual fly-tipping statistics for England, and the latest release covers 2024 to 2025.
Large containers raise a further risk. HSE guidance on collecting waste warns that people sometimes shelter or sleep in large commercial bins, and that deaths and near misses have happened when those bins were emptied.
So check every lock during bin maintenance, and replace any that no longer close fully. On large containers, also check stores and lockable lids.
7. Body, Rim and Lift Points
Then look over the bin body for cracks, especially around the axle housing and the front rim. Those areas take the most stress during lifting.
Of all these areas, the rim matters most. Collection vehicles grip it with a comb or other lift, and EN 1501-5 sets safety requirements for the lifting devices that empty EN 840 containers.
So a cracked rim is not a cosmetic fault. If the rim, the trunnions or the axle housing has split, replace the bin rather than repairing it.
8. Base and Drainage
Finally, check the floor of the bin as the last step of bin maintenance. Heavy waste and repeated tipping wear the base, especially on large containers.
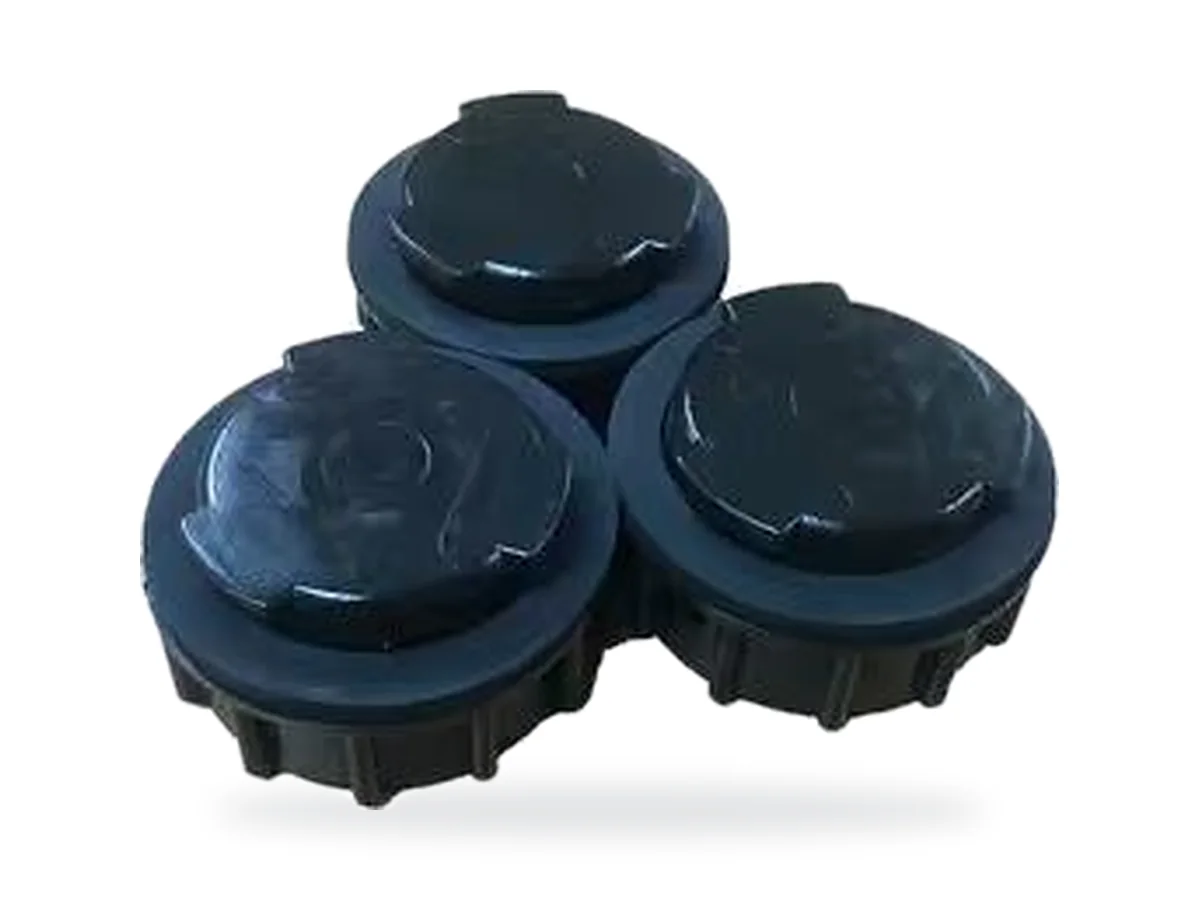
A baseplate protects that floor on new builds and repairs. Meanwhile, a drainage cap on 660 and 1100 litre containers lets staff wash and drain the bin without tipping it.
After that, check that each drainage cap sits tight and seals. A missing cap lets liquid leak across the bin store.
The Bin Maintenance Checklist at a Glance
So print this table and keep it with each crew or at the depot. It covers the eight checks in a few minutes per bin.
| Check | Look for | Usual fix |
|---|---|---|
| Wheels | Wobble, cuts, cracks | Replace as a pair |
| Axle and clips | Bends, rust, worn ends | New axle and clips |
| Castors | Stiff swivel, grinding | Replace the castor |
| Brakes | Creeping when locked | Clean, then replace |
| Lid and hinges | Cracks, missing pins | New lid or pins |
| Locks | Will not close | Replace the lock |
| Body and rim | Splits near lift points | Replace the bin |
| Base and drain | Wear, missing cap | Baseplate or cap |
Keep Crews Safe During Bin Maintenance
Repairs also mean lifting, tipping and pushing heavy bins. So plan the work with handling in mind.
HSE's RAPP tool helps employers assess tasks that involve pushing and pulling wheeled loads, and its pushing and pulling guidance explains the main risk factors.
In practice, empty bins before work, use two people to tip large containers and work on level ground. Also wear gloves, since bin bases are rarely clean.
Bin Maintenance Records That Help
Records turn bin maintenance from guesswork into planning. Even a simple spreadsheet works, as long as crews fill it in every time.
- Bin model and size, so you can compare failure rates between makers.
- Also log the street or site, which shows where kerbs, slopes or wind cause trouble.
- Next comes the fault found, using the same words each time.
- Parts used, so stock levels stay accurate.
- Finally, note the date, which reveals how long each repair lasts.
After a few months, sort the records by fault. In most fleets, a handful of faults cause most of the work, and those are where better parts or a new bin model pay off first.
Bin Maintenance for Commercial Containers
Commercial containers work harder than household bins. They move more often, carry heavier loads and sit in busy yards next to vehicles.
So bin maintenance for these containers needs a shorter cycle. Many teams check castors, brakes and lids at every wash, since the bin is already empty and clean.
Also pay attention to the lift points. Large containers ride a lifting device on the vehicle, and a damaged trunnion or rim can make that lift unsafe.
Finally, keep the bin store tidy. Clear access, good lighting and level floors all reduce damage to containers and injuries to crews.
Washing and Bin Maintenance
Washing and bin maintenance fit well together. A clean bin shows cracks, rust and worn parts that dirt would hide.
However, washing also brings water and detergent into bearings and around axles. So let bins drain fully, and refit drainage caps once the bin is dry.
In addition, check the wheels after washing. Grit flushed into a hub can make a wheel stiff, and a quick spin reveals the problem straight away.
Listen to the Crews
Collection crews see every bin, every week. So they spot problems long before any inspection form does.
Give them a simple way to report faults, such as a tag on the bin or a quick note in a phone app. Then act on those reports quickly, so crews keep using the system.
Over time, their reports also show which parts fail first on your streets. That knowledge is worth more than any general rule in a guide.
Spares for a Bin Maintenance Programme
In practice, a good stock of spares turns a long repair into a quick swap. Keep the parts that fail most often close to the crews.
- Wheel-and-axle kits for each two-wheel bin model in your fleet.
- For four-wheel containers, keep swivel and braked castors plus their bolts.
- Lids, hinge pins and lid locks matched to each model.
- Drainage caps and baseplates for large containers.
Also label each box with the bin model it fits. Councils often run several bin models, and Islington Council notes that dimensions differ between manufacturers, so the right label saves wrong fits.
Our lid parts, locks and baseplates and drain caps cover most of these spares.
Standards Behind Bin Maintenance
The EN 840 series sets out how mobile waste containers should perform. EN 840-5 covers performance requirements and test methods, and EN 840-6 covers safety and health.
Bin maintenance keeps a container close to the condition it left the factory in. So replace parts with ones that match the original specification, rather than whatever fits.
For sizes and capacities, see our guide to wheelie bin sizes.
Key Terms Explained
- Service cycle
- A fixed schedule for checking bins, such as once a year for household bins and more often for busy commercial containers.
- Hinge pin
- The pin that attaches the lid to the bin body. A worn or missing pin lets the lid fall off.
- Lid secured belt
- This strap holds a lid shut in high winds or on clinical and biohazard waste bins.
- Drainage cap
- Large containers use this screw-in plug in the base, so staff can drain them after washing.
- Total-lock brake
- A castor brake that stops both the wheel and the swivel, so a loaded bin stays still.
Bin Maintenance: Questions and Answers
How often should bins get a maintenance check?
It depends on use. Many teams check household bins during routine rounds and service busy commercial containers more often. Start with a fixed cycle and adjust it using your repair records.
What is the most common bin repair?
Wheels and axles. In most cases, a worn axle end lets a wheel come off, so replace the axle and clips along with the wheel.
Should crews repair bins on the street?
Simple fixes, such as a clip or a hinge pin, can happen on the round. Larger repairs work better at a depot, where crews have tools, space and spare parts.
When should a bin be replaced instead of repaired?
Replace it when the body has cracked, the axle housing has split or the rim used by the lift has broken. Those faults affect safety and lifting.
Sources
- HSE: Collecting waste and recyclables
- HSE: Musculoskeletal disorders in waste management
- NSAI Standards: EN 840-5, performance requirements and test methods
- HSE: Risk assessment of pushing and pulling (RAPP) tool, INDG478
- Wikipedia: Galvanization, encyclopedia article
- HSE: Pushing and pulling loads: overview
- NSAI Standards: BS EN 840-6, safety and health requirements
- GOV.UK: Fly-tipping statistics for England
- Wealden District Council: Bin sizes and maximum loads
- Islington Council: Wheelie bins guide
- Wikipedia: Natural rubber, encyclopedia article
- iTeh Standards: EN 1501-5:2021, lifting devices for refuse collection vehicles
Product figures come from the Plastic MGB catalogue. Our editorial standards explain how we check facts and fix mistakes.